
The best way to record your conference presentation or class lecture in 2021 (PowerPoint, Google Slides, or Keynote)
Do you need to record a PowerPoint, Google Slides, or Keynote presentation with audio and/or a webcam?
How do I record my PowerPoint, Keynote, or Google Slides presentations?
How do I make a video of me narrating my presentation slides? Should I use the built-in recorder that PowerPoint/Keynote has?
I’m asked these questions almost weekly, so I decided to make a blog/video about the basic steps needed to record your presentation slides.
A lot of academics, scientists, or educators need to do this but aren’t really sure the best way to go about it.
Or, they think they know the right way, but they don’t realize that their process is making their life harder (which no one needs right now!).
For example: If you wanted to know how to add audio to your PowerPoint presentation file, you’re already headed in the wrong direction for two reasons:
If you’re recording presentations the right way, the steps don’t change depending on what slide app you’re using.
You should not use the built-in recording function on your slide software.
That’s why I put together this blog post to help you with the 7 basic steps for getting started.
This article will help you record a decent presentation with audio and/or a webcam
After reading this post, you’ll know the basic components of what you need to create a decent recording of your presentation.
Emphasis on the word “decent” in that above sentence. To me, a decent video has:
good audio that isn’t painful to listen to
little-to-no background noise
no major mistakes that distract the audience (small mistakes are fine!)
That means (in my opinion) you DON’T need to create videos that:
include your face (webcams are optional, in my opinion)
require fancy or costly video editing software
have special effects
have no mistakes at all because 100% have been edited out (lol as if)
sound like they’re made by a professional voiceover actor
If you want to make Hollywood-level videos for your online course video or conference presentation, this is not the blog post for you.
If you want to make decent videos, then keep reading for the 7 basic steps to follow if you want to achieve that goal.
Before we get to that, I want to make sure you know I have a FREE training about effective presentations. Because, part of having a decent recording of your presentation does involve having good slides. Be sure to check that out after you read this post.
Step 1. Get your tech equipment to record your presentation
The very first thing that you need to do is get your equipment ready to go.
If you want a final video that sounds good and is smooth and concise, then you cannot just hit record on your computer and start.
Here’s what equipment you need:
An external microphone with basic accessories
A second monitor (technically optional, but it makes your life easier!)
Webcam (OPTIONAL)

The first thing you're going to need to record a presentation is a real microphone.
Under no circumstances can you use your built in computer mic, your webcam mic, or the headphones that come with your cell phones (like the Apple headphones).
Those have terrible audio quality and will be irritating for your audience to listen to.
Remember how in the intro we talked about wanting to make a video that isn’t painful to listen to? This is how you do that.
It is worth the money because it will be useful for other tasks you do, such as webinars, live course lectures (synchronous teaching), conference presentations, and video calls.
And if you happen to be a guest on a podcast, you definitely want a real mic to increase the likelihood that people will listen to the whole thing.
Don’t believe me? Here is my in-depth article about microphones
Hopefully you’re convinced, or that video will help convince you. If so, then your next question is going to be: What mic should I get?

The ATR2100x (Audio Technica) is your best option because:
You won’t have to worry about background noise as much.
It’s the most practical to use.
The accessories you need are affordable.
It’s the cheapest mic that also gets you great audio.
It has future-proofing features (worry about that later, though).
That might be surprising because if you go to Amazon and type in “microphone,” the Yeti is going to be shoved in your face. It has great reviews and everybody talks about the Yeti.
I don't get it because the Yeti picks up every single background noise that exists.
My video editor hated it. He had to do so much post-production just to get the sound tolerable and to not have all that background noise. It was a pain in the *ss.
I used it for two years and I thought it was fine until I tested other mics and realized that there are way better mics, and for less money.
If you like the idea of spending LESS money to get a BETTER microphone, then get the ATR2100x.
You can spend less money on a mic than that, but in my opinion it’s a waste of money because the improvements to your audio won’t be that significant. Save up your money until you can get an ATR2100x (though, ideally, your department is the one paying for this!)
No, combined headset/mics don’t sound good either. Not even the gaming ones.
Gamer here 👋 and they’re not good enough for this purpose.
When I've done calls with people who are wearing headsets, I'm not impressed with the audio.
I would actually prefer you just get a Yeti. Combined headsets are that bad. They have like a…. watery sound. I think it’s the noise cancellation. There might be some $500 sets out there that sound great, but I'm assuming you're on a budget.

After 2 years of frustration with my Yeti, I ditched it for the ATR2100x. I then used the ATR2100x for about a year (I’ve since upgraded to something extra fancy).
I was much happier with the sound and my video editor was much happier with the sound. It took a lot less work to get the audio sounding decent.
In addition to the mic, get a foam cover and/or pop guard.
The mic will probably come with a desk stand, which is okay. I recommend getting a boom arm though, so it’s easier to use.

I also recommend you get a second monitor
How do you see your presenter notes when giving your presentation?
You use a second monitor. Or, I guess you could print them out? If you have a printer…
DO NOT record your screen while in editing mode. No one should be seeing your side panel or notes section. It’s just … wrong.
For the love of all things caffeinated, just get a second monitor. It can be the cheapest one possible, the quality doesn’t matter at all.
This isn’t to make me happy, this is about making your life easier. And that’s exactly what a second monitor does—makes your life easier!
Third, have a webcam if you want to show your face
But you already know you need a webcam if you want to show your face :)
What you probably want to know is which webcam to buy.
The answer is: it doesn’t really matter.
Get something that’s at least 720p, and don’t spend too much on it (say, $120 or less). Don’t bother getting one with upgraded audio because it won’t be worth the extra cost.
Step 2. Write a script
I’m willing to bet you stumbled on this blog post because you’re having a hard time recording your presentations right now.
Maybe you were unhappy with how it sounded. Chances are, that’s because you didn’t have a good mic.
But that’s not the only reason academics, scientists, and educators struggle.
The other reason people struggle is because it’s super hard and super awkward to make a recording of yourself.
Does any of this this sound familiar?
You’ve had to restart your recording over and over.
You got frustrated with yourself for making too many mistakes.
You had ALL THE IDEAS in your head, but as soon as you hit record your mind went blank.
You had an organized talk in your head, but as soon as you hit record you went off on all kinds of tangents.
This one surprises a lot of people, but the easiest way to fix that is to write a script.

Recording is a lot harder than you think. Nearly everyone (including me) underestimates what it takes to record videos.
If you're fine presenting in-person, and have no problem just … talking in front of a group, you’ll probably think you won’t need a script. You probably think you're just going to be able to hit record and talk.
Hah. lolz.
I mean, maybe. It probably happens like that for some people. But, for most people (and what you should assume when you first start) it doesn’t work that way.

It’s SUPER WEIRD recording videos.
You aren’t talking to anyone, and you have no faces to look at.
You’re staring at your webcam and talking to it. With enthusiasm.
You’re talking to a webcam like it’s your BFF and you’re catching up on the latest and greatest in your industry.
That’s really hard to do, and takes a lot of practice to do well.
Make this easier for you by having a script.
The entire recording process goes so much smoother and helps you avoid forgetting what you wanted to say.
Having a script prevents you from going on tangents, and that helps keep you focused.
While in a face-to-face presentation, you might have some leeway for going off on tangents or long pauses, etc. But in a recorded video? People have near-zero patience for that. You have to be smooth and keep up the pace if you want people to watch your videos.
I know what you’re thinking: “But a script will make me sound like a robot!”
Or, maybe you’re thinking: “I already have no time. I can’t make time for writing a script!”
Did I get that right? If so, I have good news for ya: you’re thinking about scripting all wrong.
When done right, it doesn’t really take that much extra time and it’s the #1 strategy to prevent you from sounding like a robot 🤯
Learn more about how to script and practice your presentations here
3. Design engaging slide presentations
Okay, this step is probably going to be the hardest.
You really, really, really need to have well-designed, effective, visually engaging presentation slides (effective includes accessible slides) .
Tell me, do you think webinars are boring?
Chances are you said yes.
Ok. Now tell me, why do you think webinars are boring?
If you’re like most academics, scientists, or educators then you said something like:
It’s hard to engage people when everyone is sitting at a desk
Zoom sucks, everyone has Zoom burnout
There’s less energy when doing a webinar
In other words, you probably think that there’s something inherently wrong with the webinar format.
That doing an online presentation dooms the presenter into creating a boring presentation.
Not true.
We hate webinars when the presenter does what they always do: a #DeathByPowerpoint presentation with wall of text slides that are just read to the audience.

When it’s an in-person presentation, the presenter’s presence and energy can often compensate for the boring slides.
We can watch the presenter and pretend their slides don't exist, and it feels kind of okay.
In a webinar (and video) we lose that option.
So do not torture your students with #DeathByPowerpoint lecture slides.
Bad presentations make it really hard on on your audience.
Bad presentations make it more likely your audience won’t pay attention, understand, remember, or use the information you share.
What do I mean by #DeathByPowerpoint? Well, I mean slides that look something like this:

If this is how your slides look, it's going to be extremely difficult for your students or audience to pay attention to, understand, and remember what you're sharing with them.
Slides like those are not meeting your audience “half way.”
Don’t feel bad if your slides are #DeathByPowerpoint. I’m not trying to judge you or shame you, because it’s honestly not your fault.
Did your graduate program include comprehensive training on how to communicate effectively using slides?
No, it (probably) didn’t. Even though we give presentations all the time, we aren’t trained to do it well.
Luckily, though, I have the training you need to get you caught up to speed. You can get started with my FREE video, too!
4. Choose your screencasting app to record a presentation
Now it’s time to choose your screencasting application.
Do not use the recording feature built into PowerPoint or Keynote.
That can glitch out.
Sometimes, the audio and video will be out of sync.
Or, worse, there is no audio at all.
If you’ve ever received that “We’re sorry. Some of the narrations weren’t exported to the video file” message, you know what I’m talking about.
But even if it worked perfectly every single time, the audio is poor quality and sounds very distorted.
Speaking of distorted audio, don’t use Zoom to record your presentation either.
The audio compression in Zoom recordings is awful (Dear Zoom, please fix this!). I only use Zoom to create recordings if I’m doing a live presentation and just want to share the replay.
But if you’re just creating a video and there is no live (synchronous) component, then don’t use it.
There are a TON of screencasting apps out there, and I’ve tried a lot of them, so here are my recommendations for FREE screencasting apps.

If you're using a Mac, you are in luck. You have Quicktime.
It’s free, and already on your mac.
Quicktime is one of the best screencasting programs out there.
The raw audio sounds really good (assuming you have an external mic, of course!). It sounds better than Screencast-o-matic, even!
It’s also really easy to use — just a few clicks and you’re on your way!
The downside is that (last I used it), you can’t show your camera video at the same time as your screen.
I also love Open Broadcaster Studio (OBS).
I love OBS because:
It’s free
It works on Windows and Mac
The raw audio sounds great
You can use your webcam with it
It’s highly customizable
It's what I'm using for all of my videos now.
It looks super intimidating at first, but it’s actually really easy to use and still takes just a couple clicks to get going.
Before I had OBS, I tried using the Xbox game bar thingie for Windows 10 and I didn't like it. It's not meant for presentation slides. It's not a desktop/screen recorder. It's a window recorder, and there is a difference.
5. Hit record
I mean, duh. This is clearly a step :)

Now that you have everything ready to go, it’s time to hit record.
Basically you’re going to:
Open PowerPoint, Google Slides, or Keynote
Open your screencasting app
Set up your equipment (you choose the devices in your screencasting app)
Hit “presenter mode” and record!
Stop the recording.
That’s how you record your PowerPoint, Google Slides, or Keynote presentation with audio and/or a webcam.
You don’t use the slide software to do it. You use a screencasting app to record your desktop.
Make sure you stay hydrated and take breaks. I can usually only do about 1-2 hours of recording at a time, but others can record for longer. Find your ideal length through practice and trial and error.
PRO TIP: You need to AMP UP the excitement and enthusiasm.
If you have an NPR-like voice, your viewers will fall asleep and your videos will be torture to get through (sorry, but I’m not here to lie to you — I’m here to help you make kick ass videos your viewers will enjoy watching!).
Be excessive with your energy, even if it means you can’t record for as long as you want.
Plan ahead and give yourself extra time to record. Also, be kind to yourself and trust in yourself. It is weird at first, but you will get better with practice, I promise!
6. Edit your videos after recording a presentation
Once you have your raw video file, then it's time to edit it.
Do not try to avoid editing, it’s crucial to an efficient workflow and smooth videos that don’t irritate your viewers!
At the very least, you need to edit out that part where you’re choosing presenter mode and stopping the recording.
In both Mac and Windows, you can do this using built-in software. In Macs, you do it in the finder. In Windows, you do it in the Photo app.
But…you’ll also want to edit out the big mistakes.
Before you rage quit and exit out of this blog post, hear me out…
Remember back in step two I said that having a script is one way to make recording easier?
Guess what.
The other way to make recording easier is to edit them!
It's so much easier just to record a long video, make mistakes along the way, pause, start over and edit those out.
Leave the minor mistakes in there. Focus on removing the ones that are really long or distracting.
Spend the 1-2 hours to learn how to edit and it will pay off in the long run.
Trust me.

Once again, Apple users, you have a huge advantage here because you've got iMovie. It's free and is the easiest video editing software I have ever used in my life.
I literally just figured it out without any training. (But if you struggle, there are plenty of YouTube videos to help you learn it. It is super easy).
Windows users?
lolsob

This is going to suck.
We can’t make up our mind with this.
For years, my editor used Final Cut. We used Apple products for a really long time and Final Cut is one of the best video editing apps … but it’s expensive and involves a steep learning curve, which is why I'm recommending iMovie if you have a mac.
But then we switched to Windows. And THAT was a pain because of video editing apps. He tried DaVinci Resolve, Camtasia, Screencast-O-Matic, Adobe Premiere, Filmora, and more that I'm forgetting.
Screencast-O-Matic, Adobe Premiere, and Filmora just weren’t doing it for us for a variety of reasons.
Camtasia is okay, but editing out mistakes is actually not that easy in Camtasia compared to DaVinci Resolve and Final Cut.
Camtasia has easy annotations and zooming … but I don’t do that in my videos during post-editing so we needed to prioritize how the app edits out mistakes.
Plus, Camtasia is super expensive and there’s issues with upgrading to new licenses, etc.
So, we (he) tried Davinci Resolve and it was fine. It’s free but also hard to use. Sadly, we kept getting random “artifacts” in our videos (weird glitch thingies). It might have been his graphics card. Who knows.
We’re back to using Final Cut now, after all that. (long sigh).
In short:
If you have a Mac, use iMovie
If you have a Windows, use whatever you want and good luck
7. Add captions to your videos
You need to add captions to your videos. If you teach at a university, it’s probably a requirement of ADA.
Some people say that transcripts can work as an alternative, but I tend to disagree with that. Imagine if TV shows didn't have captions, but instead your only option was to download the script. Yeah. You could see how that would not be very accessible, right?
So, in my opinion you can have captions and a transcript. Sure, why not both? But I would not recommend only a transcript.
We use Rev.com for captions for my YouTube videos and it costs $1.25 per minute of video. You’ll need to check with your department or university about options. They are expensive, as they should be, it's an important service.
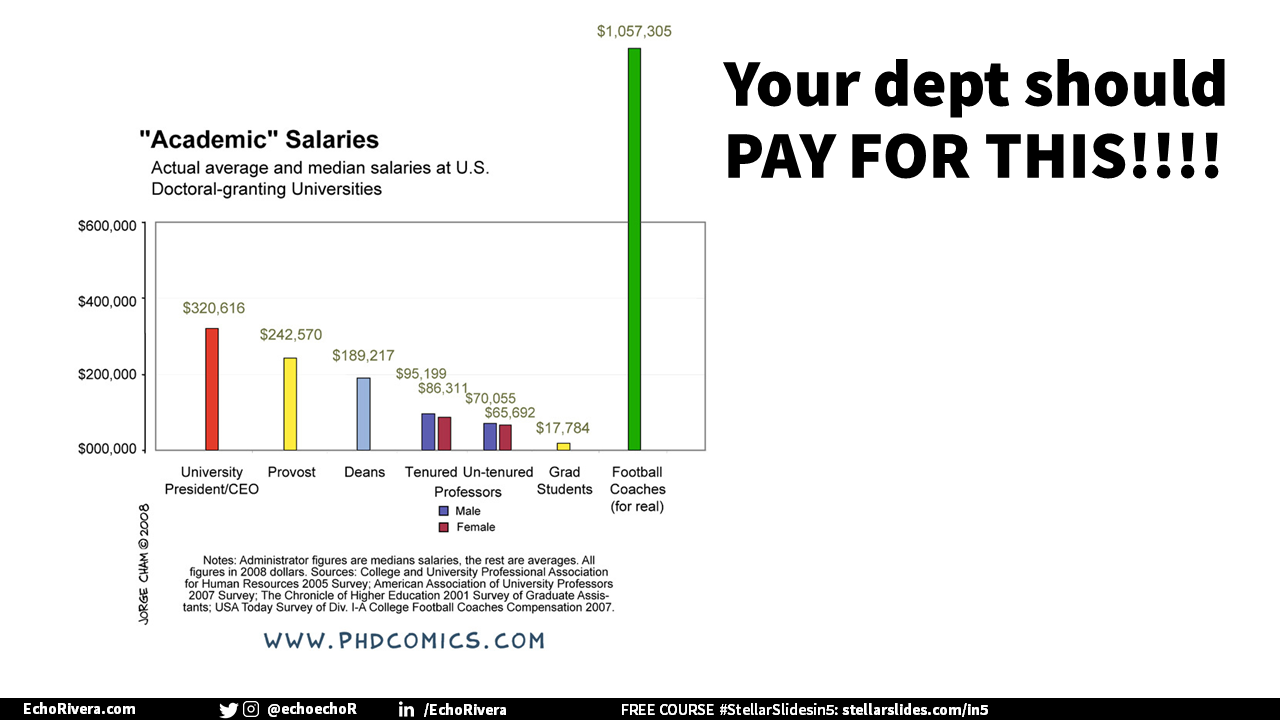
And, in my opinion, your department/university should be paying for this. They should be covering the cost of this to keep all of their courses accessible. They spend all kinds of money on salaries for administrators and sports coaches. So there should be a budget for ensuring lectures are accessible and ADA compliant.
But you know…that's just me and my opinion.
So ask around and see if there are funds for this.
As a backup option, you can add live subtitles in Powerpoint. I don't know if it's good enough to work as captions. You really should try to get professional captions first, but if you're really in a pinch, maybe these will work better than nothing at all?
You got this 💪 your presentation recording will be great!
Okie dokie.
These were the seven basic steps to get you started with recording your presentations.
Obviously there's more involved and I know you have lots of questions, as you should, but hopefully this is enough to get you started.

Just in case it's not obvious, this is not something to rush into and do at the last second!
It takes a lot of time, planning, and a lot of effort to do well. It's totally worth it—I love having online videos and online courses—but if you don't do it right the first time having to redo it really sucks.
And I’m speaking from experience here, so do it right the first time. Plan ahead and give it the time it needs.
If you found this post to be helpful, then I think you’re going to LOVE my free training.
Don’t leave without at least checking it out first ~
with joy,
Echo Rivera, PhD