
How to Draw (and create animated drawings) in PowerPoint [2021]

Have you ever been working on your PowerPoint presentation and thought: I wish I could just draw this!
I know I have. Chances are, you have too and that’s why you’re reading this post.
If you’ve been missing the simplicity of being able to do that when you used an overhead projector (lol remember those?), then this is how you can add that capability back into your presentations.
In this article, you’re going to learn 2 ways to draw in PowerPoint. Specifically, you’re going to learn:
How to draw in PowerPoint and then have it animated during your presentation
How to draw in PowerPoint while presenting
This article was made for people who need to share educational presentations. For example:
academics,
scientists,
educators, and
similar professionals
Before I dive in and start showing you how draw in PowerPoint, I want to make sure you know about my FREE training on engaging presentations:
Just in case you’re not sold on the idea of drawing in your slides, let’s talk about why you should do this in your presentations.
Why should you learn how to draw (and animate that drawing) in PowerPoint?
Look, it’s well established that visuals are important for every presentation.
If you’re sharing educational information, or any type of data, then visuals will encourage your audience to pay attention.
Visuals will also make it easier for your audience to understand, remember, and use the information you share.
Although there are a lot of free visuals out there on the internet, and even though PowerPoint has built-in icons that are great….
…Sometimes, it’s a lot easier to just sketch or draw something out than it is to find the perfect visual or icon for it.
A simple drawing or markup on a slide can sometimes be the easiest way for you to explain your educational material.
Plus, audiences love it!
It’s truly a win-win and I recommend you give it a try in your next lecture, conference presentation, webinar, or training workshop.
You could draw in PowerPoint to explain a model or a process::

Or…maybe for a formula?
I can’t be the only one who has searched online for a picture of a formula, to be disappointed with how low quality and pixelated it is.
But even if it looks great, the real problem is that you can’t really walk your students or colleagues through each part of the formula if you wanted to.
So it can be really helpful to write out each piece one at a time so you can explain each step along the way.

Or maybe you everyone to look at a specific part of your slide.
Being able to draw a quick circle or and arrow can help with that.
Or maybe you just want your presentation to be extra engaging, and have some advanced ideas for how you could draw the models, ideas, theories, or educational content you need to share.

Yup, this was made in PowerPoint! (Office 365, March 2020)
There are a lot of reasons being able to draw on your slides can help increase the quality and professionalism of your presentation.
And the good news is that now you have 2 options for how to do that.
How to draw in PowerPoint and then animate it
In this section, we’re going to talk about how to draw something and then animate it ahead of time.
We’re going to use the “Draw Tab” in PowerPoint (to create the drawing), and then the “Ink Replay” animation to animate it.
Before PowerPoint introduced the Ink Replay Animation, your best option was to have a blank slide in PowerPoint, and then draw on the slide while presenting.
I do talk about that option next, but the downside of that approach is you’ll have to do that again and again each time you present.
I’m a huge fan of doing something once and then being able to reuse that again and again.
That’s exactly what you can do using the Ink Replay drawing animation.
With this feature, you will draw it once — ahead of time —and the drawing animation will be there every single time you present!
Watch this feature in action in this video >>
How to draw in PowerPoint and then animate it
Click the “Draw” tab (see image below; if you don’t see it, your version of PowerPoint doesn’t have it, see below).
Click on the pen or highlighter you want to use.
Click the down arrow to choose the size (and/or to change the color).
Draw/write what you want.
Select the pieces you want to animate (usually you’ll select everything you just drew).
Click the “Animation” tab.
Click “Ink Replay.” (see image below; if it’s not clickable, it’s because you haven’t selected the pieces you just drew). If you don’t even see it, your version of PowerPoint doesn’t have it (see below).
Adjust the animation settings (e.g, Duration) so it goes the speed you want, and only animates when you want it to.
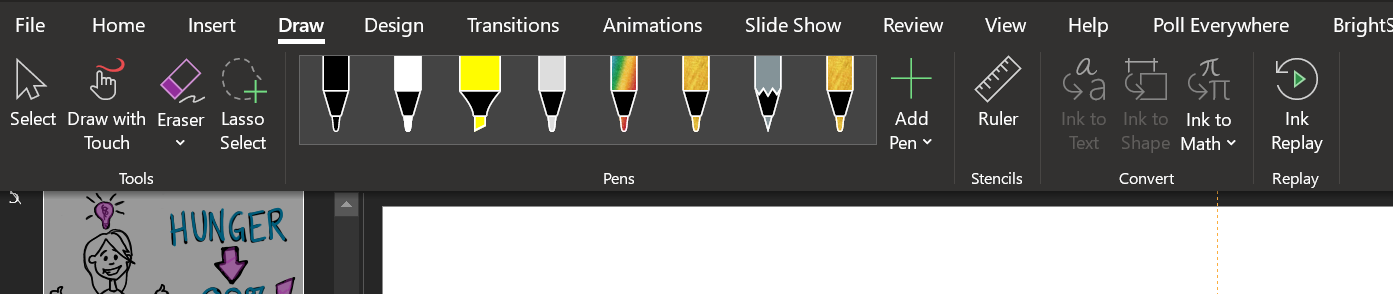
A screenshot of the “Draw” tab, showing the different options for pens.
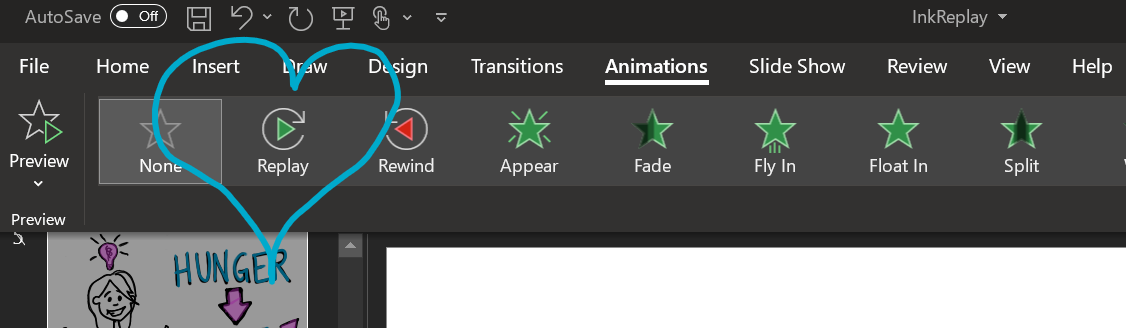
A screenshot of the "animations” tab, showing the “Ink Replay” option
That’s it!
This feature is amazing and is yet another reason PowerPoint is my #1 recommended software to use for presentations.
Pro tip: You can use multiple pens in a single slide, so you can use different colors or the highlighter to help you focus their attention on certain parts of the slide.
Other ways to use your drawings in PowerPoint
So far, I’ve focused on the ways you can use your animated drawings in PowerPoint for education.
But there are other ways you can use this feature!
You can use this feature to create an explainer video.
You can also use this feature to create your own visuals for other ways you might communicate information — like visuals for blog posts!
Which version of PowerPoint has this feature?
That depends on when you’re seeing this. Here is the Microsoft Office page that lists which versions have this feature.
2. How to draw in PowerPoint while presenting
Good news: This option is easier thank the Ink Replay / Drawing Animation one and is available on more versions of PowerPoint.
1. Go into presenter mode (i.e., start presenting)
2. Start moving your mouse, and then look to the bottom left for a bar that will pop up.
3. Click the icon that looks like a pen.
4. From there, you’ll be able to choose the pen, highlighter, or erasure
5. Draw (and/or erase!)
(you could also choose a laser point, but don’t. Those are annoying).
I show you the entire process here:

When you’re done, PowerPoint will ask you if you want to keep or discard the drawing. That’s totally up to you.
However, it will not be animated the next time you show it. That’s why I like option #1 so much.

Although this option is easier to use, I do want to caution you that it can slow down the pace of your presentation significantly. The time it takes to click through everything and draw is slow, and you can lose the attention span of your audience during the process.
If you have the Draw tab and Ink Replay animation, I strongly encourage you to use that instead.
Once you start drawing on your slides, you might have more questions, such as:
Strategies for getting smoother lines and better drawings
How to fix it when the animated drawing order doesn’t go the way you wanted
Recommended set up and pens to use
These are all great questions, and the answers are in my signature course, Blast Off to Stellar Slides.